DIY FIREPLACE STEP BY STEP TUTORIAL
This post contains affiliate links, please refer to my disclaimer for details.

Woowee!! I am so excited to write this blog post with all the details on how we built our recent fireplace! So you can build your dream fireplace too. This project was quite straight forward and totally doable for a moderate skilled DIY’er. And a big $ money $ saver when you build it yourself!
FIREPLACE DIY MATERIALS
– 1 x 8 10ft common board (we purchased 2, these were used as our studs/anchor to the wall $13.90 each)
– 2 x 4’s for frame of fireplace (we purchased 10 at 10ft for $4.95 each)
– underlayment (we purchased 3 4ftx8ft sheets and had some extra, this is what we used for the whole exterior of the fireplace. $42 total, very inexpensive)
– outside corner trim for sides ($14.23 each, purchased 2)
– lattice trim pine (1-1/2” for bottom and top trim of fireplace)
– paint (we used Peppercorn and Pure White by Sherwin Williams)
– painters tape
– stencil (if you are wanting to do a design like we did)
– paint brush and rollers
– wood filler to fill nail holes before painting
– nails and nail gun
– 2 1/2inch construction screws for frame
NOTE:
Home Depot will cut all of your wood for you if you know your dimensions. However, we used my father-in-laws chop saw and jigsaw for this project. The entire frame structure (including screws and nails) cost around $165.
Next we worked on inserting the electric fireplace insert. Click here to find the actual one we installed.
LET’S GET DOWN TO THE DETAILS
STEP 1
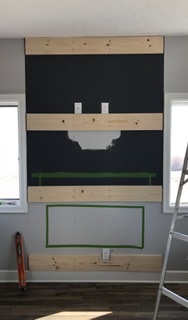
First, we measured where we were going to put the fireplace in our home and wrote down the measurements. I also used painters tape to help myself visualize where everything would go on the wall.

Once we decided on how wide, high, and deep (this will depend on your fireplace insert and preference) we wrote down our measurements and went to Home Depot to purchase the supplies we would need for framing out the fireplace.
++++For reference, our fireplace frame went from floor to ceiling (9ft), is 5ft wide and about 9inches deep. We decided to go for a more sleek look by having it be only 9 inches deep because our home is quite small.
STEP 2
Once you have all your wood purchased, it’s time to start framing. We first found the studs in our wall and then screwed the 1 x 8 boards to them in order to act as an anchor for our entire fireplace frame structure.
STEP 3
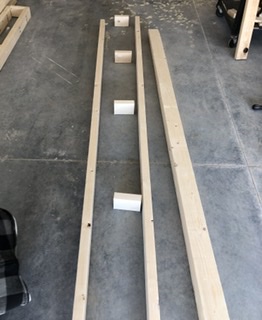
Once we had those boards up we then started cutting the 2 x 4’s to act as the side panels of our fireplace frame (these measurements will determine how deep you want your frame to be). See picture below. The measurements you use will depend on the height, and depth of your fireplace structure. Once we had the side walls built, we brought them in and screwed them into our 1 x 8 boards.

STEP 4
Now that you have the side panels screwed into your anchors (1 x 8 boards), it’s time to start building the inner part of your fireplace frame. This part will essentially fit snuggly inside your side wall panels. You will create a rectangular like box that will fit like a puzzle piece into your side panels. Below you can see several different pictures of what ours looked like. As stated above, these measurements will depend on what you decide you want to build.
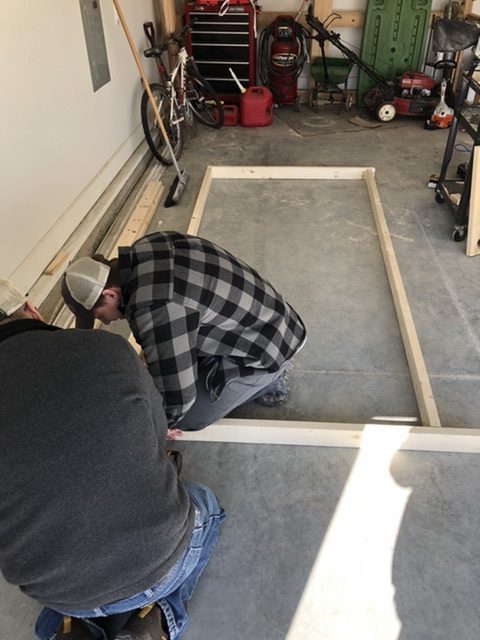


+++NOTE, you will need to make sure you know your fireplace insert measurements so you can accurately build the right size for it to fit into. We also added several 2 x 4’s in the middle to act as the studs for us to mount our tv onto, as well as a space for the cord to go through.

STEP 5
Now that you have the framing part of your structure done, it’s time to finish the outer shell. For this, we decided to go with a thin underlayment material because it was very inexpensive. As stated above we bought 3 4ftx8ft sheets and cut them to the correct size using a jigsaw. We knew that the lines did not need to be perfectly straight because we would be putting trim around the corners and top/bottom of our fireplace structure, so the jigsaw worked just fine. We also used the jigsaw to cut out the fireplace space and where the tv cord would go through. Our fireplace insert had a small lip so we knew if the jigsaw line wasn’t totally straight, that lip would cover it.

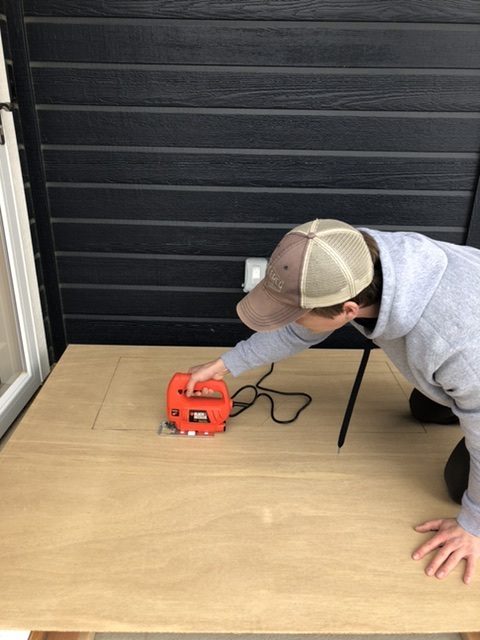
Using the jigsaw to cut out the fireplace space.
We used a nail gun to attach the underlayment to the frame of our fireplace. Then I used wood filler to cover the nail holes before I painted.

BONUS FIREPLACE PROJECT TIP:
Before we started putting the underlayment on, we took a picture of the frame with a measuring tape also in the photo so we would know exactly where our studs were at. This was helpful when mounting the mantel brackets.
STEP 6
Hold on folks, we’re almost there 😉 Now that your structure is up, it’s time to get down to the fun part (well, I think it’s fun anyways) which is creating the design of your fireplace. I decided to go with two different colors for our structure. I first painted the bottom section Pure White by Sherwin Williams and then did the top and side panels in Peppercorn by SW.
Next, I used this stencil to create a tile like look to our fireplace. I used a small foam roller to apply the paint. Note, you do not need to use a lot of paint when stenciling.

This stencil is from Cutting Edge Stencils and is linked above.
STEP 7
Now that you have spruced up the exterior it’s time for the final details!! Attaching the corner trim and bottom/top/side parts of your fireplace structure. We simply used our nail gun, which made the job super quick and easy. Lastly, mounting the mantel and television, as well as inserting the FIREPLACE!!
For our mantel we used industrial pipe brackets and screwed them into the studs of our frame. I bought a board from Home Depot for our mantel and decided to leave it as the natural wood.


AND THAT IS IT! YOU CREATED YOUR VERY OWN FIREPLACE!
Sit back and enjoy all the coziness!
If you have any questions regarding this DIY tutorial, please do reach out to me via the comments on this post or simply send me a DM on Instagram. I also have a saved video highlight on my IG feed of this entire process (find it under DIYFIREPLACE).
Thanks for stopping by!
Happy Creating,
Holly
