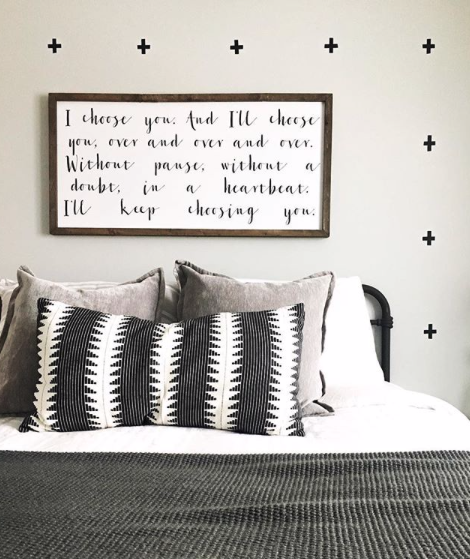
There’s a reason it’s called a “statement wall”. Whether it’s a beautiful, bold paint choice, wallpaper, or my personal favorite, shiplap. It seems like statement walls are all the rage. But if you’re like me, you struggle to find the time and, let’s be real, the money to do them. Sooo, is it possible to get a beautiful statement wall without spending the $ money $ and having the project take up all of your free time? I’m happy to tell you, YOU BETTER BELIEVE IT, Y’all!!! Are you ready to see how!? LET’S DO THIS!!!
This post contains affiliate links. Please read my Disclaimer for more information.
MATERIALS–
-WASHI Tape (link provided for the exact tape I used)
-Ruler and/or measuring tape
-Pencil
-Scissors
Aright, let’s talk materials!
I stumbled across the most beautiful, inexpensive, easy to use material, I have ever laid eyes on 😉 I GIVE YOU…..WASHI TAPE. I ordered mine off Amazon for $12 (link provided above), and it included 4 rolls! 4 ROLLS, PEOPLE!! I also love the fact that they had lots of different colors. Making a statement wall with this tape is so easy and fun, because you totally get to be creative and make whatever design you can dream up!
For this project I decided to make a simple statement wall in our master bedroom. I went with the black tape and did small crosses. First, I measured 12inches from the top of the ceiling. Then I eyeballed from the side where exactly I wanted the statement wall (cross) to start. I honestly did this because it was easiest to keep track of using my 12-inch ruler. All the crosses were 12 inches from the top of the ceiling and the same distance apart.
Measuring
How far apart you space the design and what design you choose is completely up to you! Each time I measured 12 inches I would use a pencil to make a small dot on the wall so I would know where to put the cross.
Next, I made sure each length of tape for the cross was the same size using my ruler and then I cut the tape using a scissor. By using a scissor vs tearing the tape, I was able to achieve a more crisp and consistent line.

And that my friends, is literally IT! This project took hardly any time at all, cost next to nothing, and made a huge impact on our wall!! WIN, WIN and WIN! I would love to see what you do with your walls using this technique! Send me allll the pictures 🙂